Dungeons: Difference between revisions
m (Added image) |
|||
| (68 intermediate revisions by 2 users not shown) | |||
| Line 1: | Line 1: | ||
[[File: Dungeon_Crystal.png]] | <center> | ||
[[File: Dungeon_Crystal.png|link=]] | |||
== | </center> | ||
Dungeons look like | ==Overview== | ||
<div style="float:right; margin-left:10px;"> | |||
[[File:DungeonOfferPass2025.png|230px|thumb|left|Moments before entering a Hard Dungeon.|link=]] | |||
</div> | |||
Dungeons look like the floating crystal shown above, and they contain valuable items within. Clearing a dungeon will net you some of those valuables, along with a good amount of Player EXP. It is recommended that you go into Dungeons with a party, not only because other players will help you clear the Dungeon easier and more quickly, but also because '''each player gets their own Boss Chest.''' | |||
To enter a dungeon you must first be in a party, and the party leader must have at least one type of [[:Category:Pass|Dungeon Pass]] in their inventory. Normal, Hard, or Extreme. Upon interacting [spacebar] with the floating crystal, a window will appear. The party leader must then drag their chosen Dungeon Pass into the designated box as an offering. Greater difficulties yield greater rewards, but they also demand that you fight harder foes. And be sure to pay attention to any and all Echoes on your [[:Category:Pass|Dungeon Pass]] too! | |||
<!-- | |||
The difficulty of the dungeon you enter is entirely decided by the item you offer: | |||
<div style="float:right; margin-left:10px;"> | |||
[[File:DungeonEnter.png|thumb|left|[[Red Shard]] has a rarity of 1.<br> This will be a Normal Difficulty Dungeon.|link=]] | |||
</div> | |||
{| class="wikitable" style="margin:left" | {| class="wikitable" style="margin:left" | ||
|+ Dungeon Difficulty | |+ Dungeon Difficulty | ||
| Line 12: | Line 22: | ||
| Item Rarity 7-9 || Extreme Difficulty | | Item Rarity 7-9 || Extreme Difficulty | ||
|} | |} | ||
--> | |||
After clicking "Enter", the offered Dungeon Pass will be erased from the party leader's inventory, and the party will be sent into the Dungeon Entrance. The dungeon's layout will be mapped in the upper right-hand corner of your screen as you progress. | |||
''Every dungeon that you enter is procedurally generated, making each run different from the last.'' | |||
''Good luck!'' | |||
<!-- | |||
This means that if you offer a different item for your next dungeon run, even if it has the same rarity, you will enter a dungeon with a different layout. However, this also means that you can enter a familiar layout by offering the same item. Keep in mind that these generated layouts do reset occasionally, so layouts will not be the same from one day to the next. | |||
Also. If someone outside of the dungeon has their own Dungeon Pass and offers the same item your party used to enter, they will join your instance of the Dungeon. This can be useful if a player dies and needs to re-enter the dungeon, or if you'd like to run a dungeon with more players than the default party size. '''Trying to do a dungeon with a number of people higher than the party size that entered, may result in some players not getting full rewards.''' | |||
This may lead to, and has lead to, some memorable mishaps :) | |||
--> | |||
*The [[Slime Garden]] can be found on the [[Behind The Garden]] map. Drops [[Grassy Dungeon Essence]] [[File:Slime garden dungeon essence 256.png|20px|link=Grassy Dungeon Essence]]. The easiest dungeon overall, but don't let your guard down. | |||
*The [[Plains Dungeon]] can be found on the [[Plains 3]] map. Drops [[Stone Dungeon Essence]] [[File:Plains dungeon essence 256.png|20px|link=Stone Dungeon Essence]]. Very popular. Be careful of the [[Licku]]! | |||
*The [[Cave Trial]] can be found on the [[Deep Cave 5]] map. Drops [[Dark Dungeon Essence]] [[File:Cave dungeon essence 256.png|20px|link=Dark Dungeon Essence]]. Memorable, both inside and outside of the dungeon. | |||
You can also enter Dungeons solo, without needing to form a party. | |||
==Respawn== | |||
You can respawn in the dungeon up to 3 times. | |||
Should you die a fourth time, then you are removed from the Dungeon and returned to [[Spawn]]. | |||
==Boss Chests== | |||
Boss chests are one of the biggest incentives to do Dungeons, as they contain everything from [[:Category:Weapon|Weapons]] to [[:Category:Furniture|Furniture]]. They are also a good reason to go into Dungeons with a party as opposed to going in alone. As mentioned earlier, every party member gets their own Boss Chest, and so the more chests that spawn the higher the likelihood of ''everybody'' getting what they want. | |||
One of the most valuable items inside these Dungeons are [[:Category:Dungeon Crystal|Dungeon Crystals]], rare materials found inside of Dungeons that are used to level up your skills. Dungeon Crystals are as rare as they are valuable, possibly even more so, which means you will very likely be doing at least a few Dungeon runs during your time playing Soul's Remnant. Because even if you don't need a Dungeon Crystal right at this moment, it is always a lucky thing to get one anyway. After all, you can always list it on the [[Auction House]] :) | |||
To help you on your journey, here's a helpful breakdown of what it is like to enter and explore a dungeon! | |||
==Room Types== | |||
These are the different types of rooms you will see in a dungeon: | |||
<div style="float:right; margin-left:10px;"> | |||
[[File:DungeonRooms.png|230px|thumb|left|The blue dot is your location. The green dot(s) are other player(s).|link=]] | |||
</div> | |||
'''Dungeon Entrance:'''<br> | |||
The room you first enter into, denoted by a blue square on the map. Within this room will be a purple Exit Portal which will take you, and only you, out of the dungeon. When trying to use the Exit Portal, it will ask you for confirmation before allowing you to exit. | |||
'''Standard Room:''' <br> | |||
Every room besides the Dungeon Entrance adds conditions onto the base of the Standard Room, which is shown as a clear square on the map. There are no portals in these rooms until they are cleared. Each of these rooms will have a single [[Slime]] in them that, after being defeated, will spawn the first wave of monsters. A new wave will spawn after the last monster of a wave is defeated, until all enemies are slain and the room is cleared. | |||
'''Key Room:''' <br> | |||
Your first main goal when entering a dungeon is finding this room, which will show up as a light red square on the map when you near it. The monsters here will be of a higher difficulty than Standard Rooms, and in the final and hardest wave one of the monsters will drop the Boss Key. A player will have to pick this up into their inventory. After the Key Room is cleared, a green portal will sometimes appear that will take you back to the Dungeon Entrance. This can help save time, but the portal doesn't always appear. | |||
'''Boss Room:''' <br> | |||
This room will appear a bright red square on the map, and any portal leading into it will also be a bright red. These portals are locked. In order to enter the Boss Room, the player with the Boss Key in their inventory will have to enter first. Upon entry, the Boss Key is removed from their inventory and other players will be able to enter after them. | |||
Remember, there is only a single Slime enemy. So long as the Slime is not killed, no other enemies will spawn within the room. After the Slime is killed, the waves of harder enemies will begin. The final wave will contain the boss monster(s), and it's up to everyone to take them down. | |||
After victory is achieved, a ''Dungeon Results'' window showing player damage contribution will appear, and a bonus amount of Soul Crystal will be distributed based on it. Successfully clearing the Boss Room will unlock one Boss Chest for each party member, and each player can only open one chest. After a chest is opened the items within it will spread out onto the floor as per usual, so be kind and don't be greedy. After everyone is done, they can individually take the purple Exit Portal that spawned within the Boss Room, or go back through the other dungeon rooms. | |||
'''Loot Room(s):''' <br> | |||
There are anywhere from zero to a few of these yellow square rooms within any given dungeon, and they're better than Standard Rooms. One chest will spawn for each party member upon clearing. The contents of these chests have a lower quality pool of items than Boss Chests, but a chest is a chest. While exploring the dungeon, there's no harm in going through Loot Rooms while looking for your Key Room or Boss Room. If you really feel like it, you can even explore the dungeon after clearing the Boss Room, looking for Loot Rooms. | |||
'''The Bright Blue Path:'''<br> | |||
Rooms with portals that lead to one another are shown on the map as having a bright blue line between them. But the line doesn't always physically connect the rooms. Even after entering a new room, the path will not update on the map. Only after clearing the room of enemies will the path be updated. Two rooms physically connected by the path tells you that both rooms have been cleared out, and that you can enter the relevant portal without having to fight anything. The only challenge that will be waiting for you is how quickly and effectively you can make it to the next portal :) <br> | |||
If you look to the image on the right, you will see that the party is split. One group is still within a cleared Standard Room, and the other has entered a Loot Room. Because the bright blue line only reaches halfway, that tells us that there is still fighting going on in the Loot Room. | |||
==Dungeon Essence== | |||
<div style="float:right; margin-left:10px;"> | |||
[[File:HardPlainsLoot.png|230px|thumb|left|An example of what you can get from Hard Grassy Dungeon (low roll). Also, the Exit Portal!|link=]] | |||
</div> | |||
Nearby every dungeon is a merchant, but these people aren't interested in something as common as soul crystal. What they, and the individual underneath the water in [[Spawn]], want, is Dungeon Essence. | |||
Successfully clearing a dungeon will reward you with a Boss Chest, and inside that chest you are guaranteed to always get two types of dungeon essence: essence specific to the Dungeon you just cleared, and then [[Generic Dungeon Essence]] [[File:Dungeon essence 256.png|20px|link=Generic Dungeon Essence]]. | |||
Merchants on the same map as a Dungeon entrance will only sell you their wares in exchange for that Dungeon's essence. For example, if you want to purchase items from the merchant in Behind The Garden, you need to have [[Grassy Dungeon Essence]] on hand. If you want to buy from the individual below Spawn's bridge, you will need Generic Dungeon Essence. | |||
'''Normal''' difficulty will get you 1 of both essences. [[File:Slime garden dungeon essence 256.png|20px|link=]][[File:Dungeon essence 256.png|20px|link=]] | |||
'''Hard''' difficulty will get you 2 of both essences. [[File:Slime garden dungeon essence 256.png|20px|link=]][[File:Slime garden dungeon essence 256.png|20px|link=]][[File:Dungeon essence 256.png|20px|link=]][[File:Dungeon essence 256.png|20px|link=]] | |||
'''Extreme''' difficulty will get you 3 of both essences. [[File:Slime garden dungeon essence 256.png|20px|link=]][[File:Slime garden dungeon essence 256.png|20px|link=]][[File:Slime garden dungeon essence 256.png|20px|link=]][[File:Dungeon essence 256.png|20px|link=]] [[File:Dungeon essence 256.png|20px|link=]][[File:Dungeon essence 256.png|20px|link=]] | |||
<!-- | |||
==Bonus Events== | |||
Occasionally, a temporary icon will appear above the dungeon. If it looks like an hourglass [[File:TimeTrialIcon.png|24px]], that is "Time Trial". If it looks like a sword [[File:DoubleTroubleFillIcon.png|20px]], that is "Double Trouble". Entering a dungeon while one of these icons float above it, will apply the bonus event to your dungeon. | |||
<div style="float:right; margin-left:10px;"> | |||
[[File:timeTrialClear.png|thumb|left|3-player Plains Dungeon Hard Time Trial]] | |||
</div> | |||
"'''Time Trial: Complete the dungeon within the time limit for bonus rewards!'''" <br> | |||
Upon entering the dungeon, a timer will appear at the top of your screen and begin to tick down. If you manage to clear the dungeon before the timer reaches '''00:00''', as in get the Boss Key and clear the Boss Room, you will receive additional rewards. <br> | |||
The | <div style="float:right; margin-left:10px;"> | ||
[[File:DoubleTroubleEXP.png|thumb|left|1-player <br> Double Trouble [[Crusher]] (+24, +126) <br> Double Trouble ''Shiny'' [[Soultree]] (+2275, +11200)]] | |||
</div> | |||
"'''Double Trouble: The dungeon's monsters are twice as hard, but give double EXP and drops.'''" <br> | |||
Monsters within this type of bonus mode are larger, having increased health as well as increased damage. This includes all waves of the Boss Room. These Double Trouble monsters also give a larger amount of Player EXP and Skill EXP, making it worth the (double) trouble so long as you're prepared. | |||
--> | |||
Latest revision as of 17:28, 17 October 2025

Overview

Dungeons look like the floating crystal shown above, and they contain valuable items within. Clearing a dungeon will net you some of those valuables, along with a good amount of Player EXP. It is recommended that you go into Dungeons with a party, not only because other players will help you clear the Dungeon easier and more quickly, but also because each player gets their own Boss Chest.
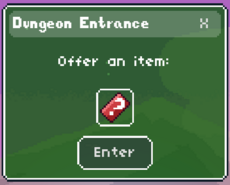
To enter a dungeon you must first be in a party, and the party leader must have at least one type of Dungeon Pass in their inventory. Normal, Hard, or Extreme. Upon interacting [spacebar] with the floating crystal, a window will appear. The party leader must then drag their chosen Dungeon Pass into the designated box as an offering. Greater difficulties yield greater rewards, but they also demand that you fight harder foes. And be sure to pay attention to any and all Echoes on your Dungeon Pass too!
After clicking "Enter", the offered Dungeon Pass will be erased from the party leader's inventory, and the party will be sent into the Dungeon Entrance. The dungeon's layout will be mapped in the upper right-hand corner of your screen as you progress.
Every dungeon that you enter is procedurally generated, making each run different from the last.
Good luck!
- The Slime Garden can be found on the Behind The Garden map. Drops Grassy Dungeon Essence
 . The easiest dungeon overall, but don't let your guard down.
- The Plains Dungeon can be found on the Plains 3 map. Drops Stone Dungeon Essence
 . Very popular. Be careful of the Licku!
- The Cave Trial can be found on the Deep Cave 5 map. Drops Dark Dungeon Essence
 . Memorable, both inside and outside of the dungeon.
You can also enter Dungeons solo, without needing to form a party.
Respawn
You can respawn in the dungeon up to 3 times.
Should you die a fourth time, then you are removed from the Dungeon and returned to Spawn.
Boss Chests
Boss chests are one of the biggest incentives to do Dungeons, as they contain everything from Weapons to Furniture. They are also a good reason to go into Dungeons with a party as opposed to going in alone. As mentioned earlier, every party member gets their own Boss Chest, and so the more chests that spawn the higher the likelihood of everybody getting what they want.
One of the most valuable items inside these Dungeons are Dungeon Crystals, rare materials found inside of Dungeons that are used to level up your skills. Dungeon Crystals are as rare as they are valuable, possibly even more so, which means you will very likely be doing at least a few Dungeon runs during your time playing Soul's Remnant. Because even if you don't need a Dungeon Crystal right at this moment, it is always a lucky thing to get one anyway. After all, you can always list it on the Auction House :)
To help you on your journey, here's a helpful breakdown of what it is like to enter and explore a dungeon!
Room Types
These are the different types of rooms you will see in a dungeon:

Dungeon Entrance:
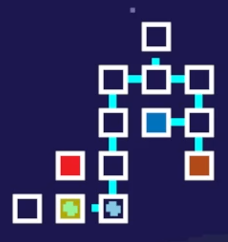
The room you first enter into, denoted by a blue square on the map. Within this room will be a purple Exit Portal which will take you, and only you, out of the dungeon. When trying to use the Exit Portal, it will ask you for confirmation before allowing you to exit.
Standard Room:
Every room besides the Dungeon Entrance adds conditions onto the base of the Standard Room, which is shown as a clear square on the map. There are no portals in these rooms until they are cleared. Each of these rooms will have a single Slime in them that, after being defeated, will spawn the first wave of monsters. A new wave will spawn after the last monster of a wave is defeated, until all enemies are slain and the room is cleared.
Key Room:
Your first main goal when entering a dungeon is finding this room, which will show up as a light red square on the map when you near it. The monsters here will be of a higher difficulty than Standard Rooms, and in the final and hardest wave one of the monsters will drop the Boss Key. A player will have to pick this up into their inventory. After the Key Room is cleared, a green portal will sometimes appear that will take you back to the Dungeon Entrance. This can help save time, but the portal doesn't always appear.
Boss Room:
This room will appear a bright red square on the map, and any portal leading into it will also be a bright red. These portals are locked. In order to enter the Boss Room, the player with the Boss Key in their inventory will have to enter first. Upon entry, the Boss Key is removed from their inventory and other players will be able to enter after them.
Remember, there is only a single Slime enemy. So long as the Slime is not killed, no other enemies will spawn within the room. After the Slime is killed, the waves of harder enemies will begin. The final wave will contain the boss monster(s), and it's up to everyone to take them down.
After victory is achieved, a Dungeon Results window showing player damage contribution will appear, and a bonus amount of Soul Crystal will be distributed based on it. Successfully clearing the Boss Room will unlock one Boss Chest for each party member, and each player can only open one chest. After a chest is opened the items within it will spread out onto the floor as per usual, so be kind and don't be greedy. After everyone is done, they can individually take the purple Exit Portal that spawned within the Boss Room, or go back through the other dungeon rooms.
Loot Room(s):
There are anywhere from zero to a few of these yellow square rooms within any given dungeon, and they're better than Standard Rooms. One chest will spawn for each party member upon clearing. The contents of these chests have a lower quality pool of items than Boss Chests, but a chest is a chest. While exploring the dungeon, there's no harm in going through Loot Rooms while looking for your Key Room or Boss Room. If you really feel like it, you can even explore the dungeon after clearing the Boss Room, looking for Loot Rooms.
The Bright Blue Path:

Rooms with portals that lead to one another are shown on the map as having a bright blue line between them. But the line doesn't always physically connect the rooms. Even after entering a new room, the path will not update on the map. Only after clearing the room of enemies will the path be updated. Two rooms physically connected by the path tells you that both rooms have been cleared out, and that you can enter the relevant portal without having to fight anything. The only challenge that will be waiting for you is how quickly and effectively you can make it to the next portal :)

If you look to the image on the right, you will see that the party is split. One group is still within a cleared Standard Room, and the other has entered a Loot Room. Because the bright blue line only reaches halfway, that tells us that there is still fighting going on in the Loot Room.
Dungeon Essence

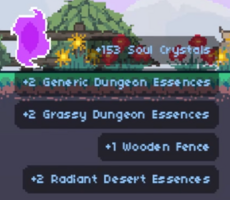
Nearby every dungeon is a merchant, but these people aren't interested in something as common as soul crystal. What they, and the individual underneath the water in Spawn, want, is Dungeon Essence.
Successfully clearing a dungeon will reward you with a Boss Chest, and inside that chest you are guaranteed to always get two types of dungeon essence: essence specific to the Dungeon you just cleared, and then Generic Dungeon Essence ![]() .
.
Merchants on the same map as a Dungeon entrance will only sell you their wares in exchange for that Dungeon's essence. For example, if you want to purchase items from the merchant in Behind The Garden, you need to have Grassy Dungeon Essence on hand. If you want to buy from the individual below Spawn's bridge, you will need Generic Dungeon Essence.
Normal difficulty will get you 1 of both essences. ![]()
![]()
Hard difficulty will get you 2 of both essences. ![]()
![]()
![]()
![]()
Extreme difficulty will get you 3 of both essences. ![]()
![]()
![]()
![]()
![]()
![]()